Friday, May 18, 2012

Inside Out Tote Bag

I found the pattern for this bag on, where else, Purl Bee! I liked it from the moment I saw it, with the neutral tone and the pop of color for the edging.  The canvas fabric also makes for a durable, final product - something very important for bags because they take a lot of abuse.  It also seemed like a good beginner sewing project for me - not too many steps, only two fabrics, and no complicated seaming.  Next, I just needed to figure who to make the bag for...  Thankfully, I had a friend with a birthday coming up, so shopping list in hand, I headed to JoAnns.  Unfortunately, they didn't have any cute patterned binding tape like the ones used in the sample.  I toyed with the idea of making my own, but I did that for the dinner napkins I made for my brother, and it was a tedious process that I was not in the mood to repeat.  Instead, I found this great highlighter orange color that perfectly popped with the light gray cotton duck.


The next step was finding the cotton webbing for the handles.  Again, my plan was foiled.  After spending literally 45 minutes walking back and forth between two aisles willing some gray cotton webbing to appear, I gave up and decided I would instead make my handles out of extra fabric.  Happy with my fabric choices and game plan in mind, I headed home, washed my fabric, and then let it sit in my closet for 6 months, untouched.  Needless to say, my friend's birthday came and went - by several months.

Finally, last week, I had some time and was able to make this bag.  And I have to say, my initial instincts were right - this was a GREAT beginner project.  I made this bag in only three days and even added a few personal touches (such as the handles and an inside pocket) to make it more unique.  And I absolutely LOVE LOVE LOVE the color combination.  I think this bag will definitely stand out and draw attention (in a good way) while my friend totes it around L.A.

Now, for the variations:
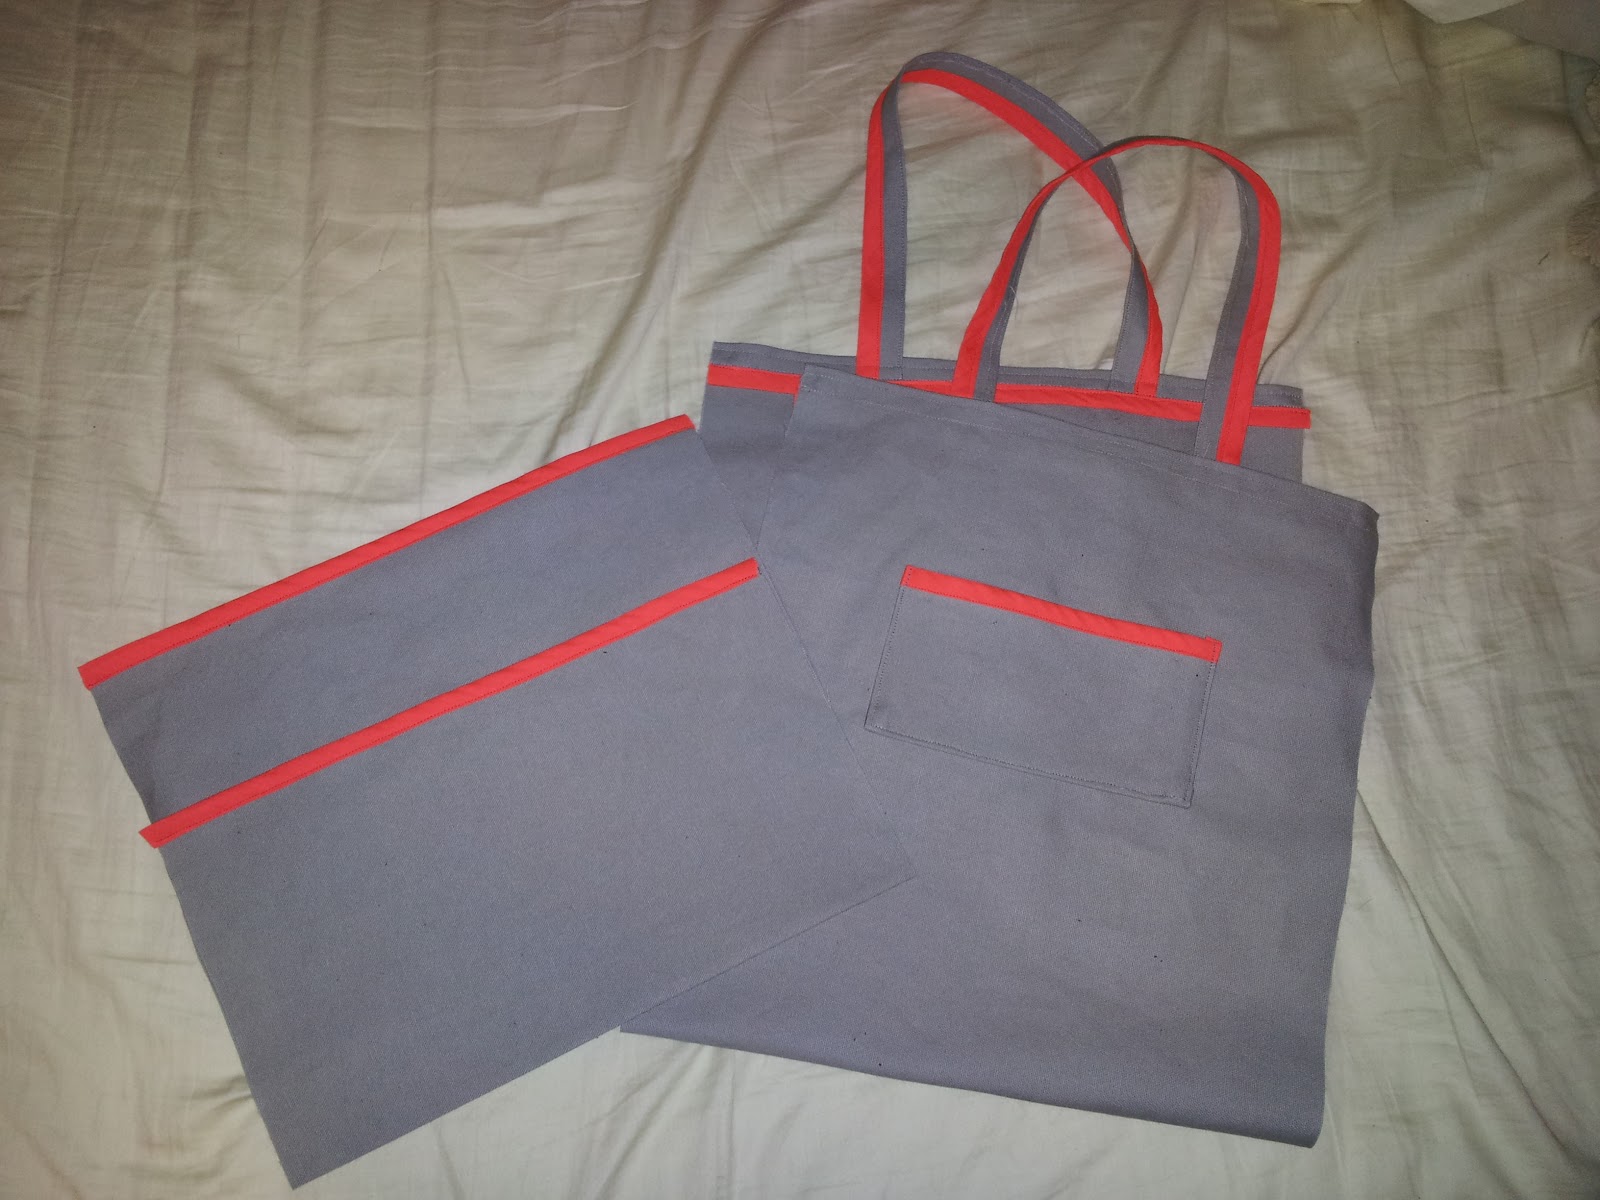
1) Handles: Since I couldn't find cotton webbing to match, I used extra fabric to make the handles.  I had to be very careful and precise with my cutting to make this work, because there was only one narrow strip along the edge that was long enough to make them.  The pattern calls for 20 inch handles, but I cut mine to 21" long just to have a little extra room to play around with.  I also cut them 1 1/4" wide so that the ratio between binding tape and fabric would be more even. My binding tape was too wide to use it on both edges of the handles, so I just did one.  My original plan for the other was to zigzag stitch the edge in the gray thread to hid the raw edge and prevent fraying.  However, I'm still new to sewing, so this did not turn out very well. Instead, I folded about 1/8 inch of the edge underneath and just edge-stitched it in place.

Main compartment of bag 
2) Inside pocket: I get a little nervous putting keys/phone, etc. in the outside pockets of bags, especially if they don't zip.  In addition to my creative gene, my mom instilled in me a paranoia that I'm going to be pick-pocketed at every turn, so I like to keep important items inside bags, where it's slightly safer.  To make the inside pocket, I took a small piece of scrap duck, folded and sewed both of the two short and one of the long raw edges.  I covered the other long edge in binding tape, then folded the three unbound edges again and stitched it inside the bag low enough that the thread lines on the opposite side would be hidden underneath the 12 inch pocket.

Outside pocket section (left) and main compartment (inside out) with inside pocket 
3) Outside pockets: I made the majority of this bag one night after work, so by the time I got to assembly, it was nearly 11pm, well passed my bedtime.  Thus, I didn't read the instructions very carefully, so I neglected to see that the main part of the bag was supposed to be nestled inside the pocket section so that the 12" pocket was on one side and the 8" pocket was on the other.  Instead, I sewed the pocket section together to form the two 8" pockets, and stacked the entire pocket section on top of the main section, so that both pockets are on the same side.  I then sewed the two parts together along all three unfinished edges.  I realized my mistake when I was rereading the instructions the next day, but I was too lazy to rip out all the stitches.  Also, I kind of liked how it looked with the pockets on the same side.

View of inside pocket
To finish the bag, I sewed the binding tape along all three edges, rather than just the sides, to hide the stitching along the bottom.

Assembled bag sans edging
All in all, I'm very pleased with the final result of my first ever tote bag and I hope my friend gets a lot of use out of it.  It will be great for going to the beach this summer!

Completed bag!
Marcia: If you see this post before the bag arrives - I hope you like it.  It's en route to you now!  Happy very belated birthday and one year anniversary!

Sunday, May 6, 2012

Wedding Kippot

My brother recently got married.  As part of my gift to him and my new sister-in-law, I made yarmulkes for my brother and his groomsmen to wear during the ceremony,  I found the perfect pattern on my absolutely favorite knitting/crocheting/sewing website, the Purl Bee.  (Actually, my google search for this pattern introduced me to the Purl Bee, and boy am I glad! It's now one of my standard, daily websites.)  I really wanted to do them in a bright, colorful yarn, but settled on blue and gray tones that would match the wedding colors.


Materials
2 skeins Shibu Sock yarn in Storm
       1 skein Debbie Bliss baby cashmerino in gray (340058)
Size E crochet hook

I made eight yarmulkes for all the males in the bridal party, plus my sister-in-law's father and nephews (I didn't photograph them all).  I found them to be a good, quick project, and the counting was pretty easy to keep track of even while watching TV.  I made my brother's a little different than the others, putting a stripe rather than a border, so that his would stand out a bit more.

It might have been the yarn I used, but I found the final product to be a bit too flimsy for a yarmulke, so I bought some fabric stiffner and blocked them using a mixture of that and water, rather than just water alone.  I did roughly a 1:1 ratio of stiffner to water, but I didn't measure exactly.  I also bought some cotton, printable sheets with a fusible backing and printed a label with the bride and groom's names and the date, then ironed them on the inside.  


My brother's unique wedding kippa
Inside of the kippot, with the label identifying the occasion
I was very happy that I could contribute something so personal and handmade to my brother's wedding and I think he appreciated the gesture.  It ended up being a fantastic day and a weekend to remember!